Tuesday, December 12, 2017

CTS #250


JOY!


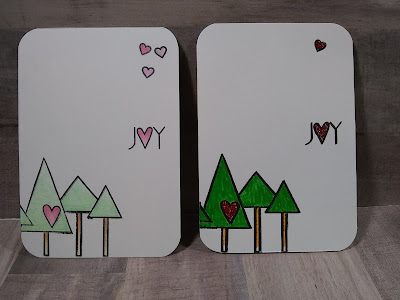
I decided to make a one layer card colored two ways for this weeks CAS(E) this sketch! challenge number 250.

The sketch just screamed for a clean and simple card.  I love to stamp and color, but have not done much of that lately.  I dug through my stamp stash and found these lovely stamps to color.

These cards are 3.5 x 5 note card size, instead of a standard A2 size of 4.25 x 5.5.  I did use my mini-Misti to stamp multiple cards at one time.  I could easily make this in a high quantity quickly.

I did want to make a few more Christmas cards this season, but I think these card could be colored for any season.  We can all use a little more joy year round.

Supplies Used for Both Cards:


Ranger's Archival Ink -- Jet Black
Paper Smooches Stamp set -- trees and joy sentiment
Stampin' Up (from paper pumpkin kit) -- heart

Right Card Colored with Soho Colored Pencils:

Permanent Green Light 181
Cadmium Green Light 183
Moss Green 182                 
Indian Yellow Ligh 109
Sanguine 215
Pink Coral 132
Rose Dore 126
                                                                      Carmine 116
                                                                                 
Left Card Colored with:

Tombow 195 and Stickles Xmas Red.

I only put one heart on the card with the Stickles, because I knew I wanted to add glitter.  I didn't want to take away from the clean and simple by adding to much glitter.

Wishing you some crafting joy today!

Monday, December 4, 2017

CST #249


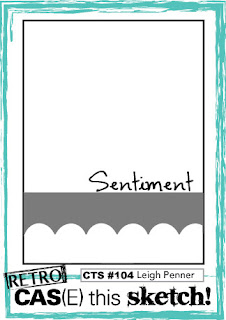
Here is my card for the CAS(E) this Sketch! challenge #249.  This was a retro sketch design for the blog, it originated as sketch 104.  I wanted to create a Christmas card using no traditional colors.  I ended up with a monochromatic card that is very stunning.


The stamp set, ink and solid cardstock are all from Stampin' Up.  The stamp set is called Flurry of Wishes, the ink color and cardstock color is Blackberry Bliss.  The Flurry of Wishes stamp set is still available for purchase at the time of this post.  The ink color and cardstock have been discontinued as it was a one of Stampin' Up's In Color collections several years ago.  If you are not familiar with Stampin' Up products, they feature 5 colors for two years which are called In Colors.  Once the two years is over the colors are discontinued.  Stampin' Up's inks come very juice, so even though  I didn't by the reinkers for this color, it is still very juice pad.  I think I will be able to get many uses out of it before it is dried up. The juiciness of the ink pads is one of the reasons I love Stampin' Up ink.  I also love that all of the colors work well with each other. Lastly, they watercolor die ink that you can use as watercolor paint (similar to Distress Inks) that dry quickly.  They also stamp very evenly, so many reasons to use these inks.

When I bought this stamp set, I also bought the matching punch for the small snowflakes. The punch is being discontinued, but I believe there are still some available at the time of this posting.  I wanted to have some dimensional elements on this card to balance out the dimension on the bottom of the card.  I also stamped the background with second generation stamping, so the ink is not as dark as the focal snowflakes.  I think this helps the focal snowflakes from being lost in the background.  I love the pattern of these snowflakes, but you could use any snowflake stamps you own to make a similar card.
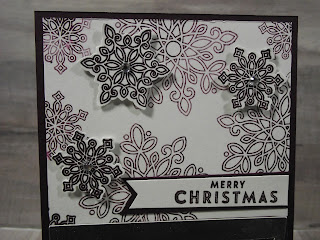

I also added rhinestones to the middle of raised snowflakes to give them some shimmer and to tie in the silver die cut at the bottom of the card.  The die cut is a silver mirrored poster paper from the Dollar store.  I cut the image with my Cricut Maker from the cartridge Give a Hoot.  Normally this design has a second cut for the background, but I deleted that layer.  I already knew based off the sketch above that I was going to cut a layer from the solid blackberry bliss cardstock.  I think that the image gives the card a little bit of whimsy. 

Overall I think this card is a very elegant non-traditional Christmas card.  I really enjoyed this sketch this week and think it can be used for so many different types of cards.

I would love to hear if you like or dislike Christmas or Holiday cards that use non-traditional colors. Please also subscribe to my blog, so you don't miss my next posting.

Happy Crafting!
Thursday, November 16, 2017

CTS #248


 Joyful, joyful I have my entry for CAS(E) this Sketch! challenge, sketch #248.  


This sketch was a little more challenging due to it having an odd shape.  I wanted to use up some of my scrap papers , so I selected them first.  The pattern paper is from Snowglobe by American Crafts.  I have had this paper in my stash for a copy of years.  It was just a small 12 pack of 6x6 papers.  I then selected kraft paper for Recollections.  I cut the poinsettia paper at 3xf4 and then used another scrap paper to figure out the angle I wanted, lightly traced it on the poinsettia paper then cut it out.  I then took two small 1/4" pieces of the candy can paper and taped them behind the poinsettia paper. The kraft paper behind the poinsettia paper is a 3x4 piece.  I did pop up the poinsettia paper with some Scotch foam tape. 


The joyful letters are from a sticker set I have had in my stash for a long time as well.  I am not sure what company made them anymore.  I love the kraft paper with these pattern papers, but thought it was a little plain in that area, so that is why I moved the sentiment up. This is a change to the original sketch design, but that is okay. Remember sketches are just for inspiration and a jumping off point.  You can change the elements around to make the card your own.  I also rounded the corners of the green striped paper which was not on the sketch either. 

Even though the shape of this card is unique, I really enjoyed making this card.  There will not be a new sketch next week on the CAS(E) this Sketch! blog due to it being Thanksgiving in the USA.  I will be posting a second card though.  I think I may make one more card of this sketch with the rest of the left over scraps I have from the paper pad.  I have one more full sheet of 6x6 for the main background piece.  

I hope this card inspires you to try some thing new in your crafting endeavors!

Thursday, November 9, 2017

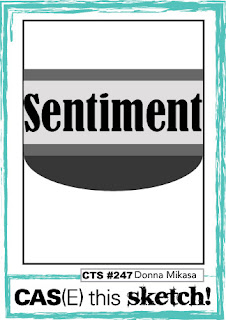
CTS Sketch #247


Here is my CTS Sketch #247 done on the same day it posted, hurray me!  CAS(E) this Sketch! website has a challenge that starts every Thursday.  I am going to try and play with them for the rest of the year.  I can't promise to have my card done on Thursday every week, but I am going to try. 

The sketch this week inspired me instantly, especially when I looked around me at the beautiful fall foliage outside.  Winter is trying to move in but I don't think fall is quite done yet for this year. 

My layers are composed of Kraft cardstock and Strathmore Watercolor paper. I stamped the leaves with Archival Ink: Coffee.  I love using Ranger's Archival Ink for watercoloring images. I really wanted the leaves to look like fall leaves that have fallen from the trees.  I noticed this year that most of the veins on the leaves have turned brown, so I thought the Coffee ink would give the same effect.  I then colored the leaves with Tombow dual markers.  The number of the colors are 847, 985, and 946.  I used my glass cutting mat as a palette with a water brush to add the color to the leaves. They came out stunning and very similar to the color of leaves I have seen this fall. 


The leaves stamp is made by Inkadinkado and the Birthday sentiment is from Unity Stamp Co.  I used my mini Misti to stamp the sentiment multiple times with the same ink as the leaves.  Then I lightly water colored the sentiment with the same colors as the leaves.  This gives more interest to the sentiment and helps to pop out the leaves.  I just couldn't stop myself from grabbing and adding some bling to finish off the card with gold rhinestones.  Birthday cards should be flashy, don't you think?

I hope you give this sketch a try. Happy Crafting!

Tuesday, October 31, 2017

Happy Halloween 2017


Happy Halloween!


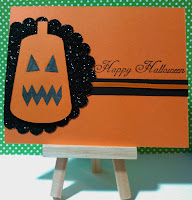
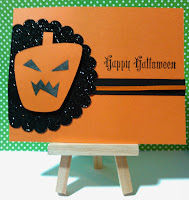
 I created these three cards for Halloween greetings this year.  I was inspired by sketch 242 from CAS(E) this Sketch! blog.  I really like the simplicity of this sketch.  It allows both the focal image and sentiment to pop. I may have to play with this sketch for Christmas cards as well.

The Jack O'Lanterns where cut from the Cricut cartridge A Frightful Affair on the Cricut Maker.  I also used the Maker to cut out the scalloped circle using the Basic Shapes cartridge.  I love how each face is uniquely scary.


Have a spooky Halloween!

Wednesday, June 21, 2017

ICAD 2017 #18


Bling-a -ding-ding! I went a little crazy with the sparkle on this card, but it was worth it.  I really love all the shiny elements.

I jumped back into my scrap pile for this card.  The wish jar image is from Unity Stamp Co.  I had actually stamped and colored this image months ago when playing with some water color mediums. I
really wanted to use this image in a card.  I love the blue background in the jar. The stars really shine with the darker background. I popped the image up with some Scott's foam tape.

The gold glitter stars are from Recollections and came in a strip all together.  I cut them apart and added them to the background. Then I added some blue sequins with Tombow clear glue.  I then added a gold rhinestone on top of the sequins. Lastly, I went around the card with some Tip Top Taupe ink by Stampin' Up with a blending tool.  It helps to pull the eyes into the focal image.

Shiny and bright.....

Monday, June 19, 2017

ICAD 2017 #17


Today's card is created with Tim Holtz's Collage 8x8 paper stack.  I thought it would be fun to create a card with some of the old pictures. I also wanted to create a peek-a-boo layout.

I picked the page with all of the different state signs. I then punched three circles out. I cut some fun foam to fit the size of the index card, and then punched some holes out of the foam.  I had to trim out the circles a little more, so they wouldn't show through the opening.  I then glued the foam down. Once it was dry I tapped down the faces.

Then I created a banner with the backside of the sign paper.  I stamped Adventure with a stamp from the Recollections Travel Jar stamp set with Archival Black Ink.  I then added two Stampin' Up Candy Dots in Neutral.  Next, I took a Gold Sharpie and outlined the circle in gold.  I then added an arrow which I also colored with Gold Sharpie.

The resulting card came together beautifully.

Sunday, June 18, 2017

ICAD 2017 #16


I had some dies that I had not used yet.  I decided to bring them out and make a little scene with them.  I love how cut this card came together.

I used dies from two sets by Jillibean Soup: Small Circle Set and Cloud Set.  I used papers from the Hootenanny 6x6 paper pack from Colorbox.  I wanted to use some patterned papers instead of just solid card stock in order to add more interest to the scene.  I cut multiple of the two balloon pieces and then glued them together so that the balloon would be popped up off the card some.

Once I had glued all of the pieces together onto the card, I added clear Wink of Stella to the balloon
circle.  It gives the balloon some more movement, plus who doesn't love lots of glitter and shine.  I also glued the balloon at an angle to give movement to the overall design.

I think the pink birds are lovely and pull the scene together.  The nice part about using a one paper pad for your whole scene is that all of the colors work well together.  You don't have to worry about them not matching.  Even the patterns themselves coordinate together.


Friday, June 16, 2017

ICAD 2017 #15


For today's card I wanted to keep it simple, and just to do some doodling and coloring.

I drew some lines on my index card with a Pigma Micron pen size 08.  I like using this size for a thicker line darker line compared to a ballpoint pen.

Once I had a nice shape, I decided on my color scheme. I went with an analogous color scheme of green and blue colored pencils by Koh-I-Noor.  I really like these woodless pencils.  They are very smooth and the colors are bright. The only drawback is that they show the texture of the paper. I find that no matter how fine a tip I have on the pencil, or how light the touch, I can't get a solid color.

I know some people want that look when they use colored pencils, but I am usually not one of them, until today. When I started coloring with the blue pencils, I was pleased with the texture coming through. It reminded me of a denim texture.  I wanted the green to be more glass like, so I used a colorless blending pencil to smooth out the color.  I love how smooth the greens became, they also darkened up a few shades.

The overall vibe of the card is soothing and calming. Reminds me of looking at the ocean.

ICAD 2017 #14


Scrap attack is back.  Today's card is the second in an all scrap card.

I started with a plan green piece of paper scrap about the size of my card.  I trimmed it down a little and attached it to the card with Tombow tape runner. Then I stamped some travel images I have from a Recollections stamp would block stamp set in Archive Black Ink.  I tried to stamp the images randomly all over the card even though I already knew I was going to cover most of it up.  I wanted to make sure the parts that are seen would look like a background paper.

Next I cut the flowers out of the a strip of paper and attached them with some Tombow clear mono-glue.  Next I cut out the tag and the sentiment piece.  I punched a whole in the tag and added some baker's twine from Stampin' Up.  I then attached the tag with some foam tape.  Next I added the sentiment with some Tombow clear glue and a few small pieces of foam tape.

I then altered the sentiment with a purple Sharpie pen, so it would read "life is about what you love"
instead of "who" you love.  I added some rhinestones to the sentiment.  Lastly, I glued down the ends of the twine on the tag.

This is just a really fun and bright card.  I really had fun making this card.  In some ways it is  a bit rough and unfinished, but I think it gives the card whimsy. Sometimes things are more moving when they are not perfect.

Thursday, June 15, 2017

ICAD 2017 #13


Scrap-a-pa-looza was today's card inspiration.  I went digging through my scraps ended up with this delightful card.

I used kraft paper for the background. I rubbed some white ink over the kraft paper to knock it back a bit. Then I added the print paper in the middle with a Tombow tape runner.  I don't know the name of this paper, but I know it came in a pack from the dollar store several years ago.  Next I punched out a bunch of 1/2 inch circles with my circle punch from Stampin' Up.  I then glued those down with Tombow clear glue.

I then added some baker's twine from Recollections around the middle print paper.  Lastly I added the wood veneer hearts down the middle with the same Tombow clear glue.  I really love the texture this card has from the different types of paper, the twine and the hearts.  I have made a couple of projects from this paper and loved how they turned out, even though I didn't love the 12x12 full pattern.  Sometimes cutting paper up makes it more appealing.

So the next time you look through your stash and think why did I buy this paper, try cutting it up and seeing if you like it better in smaller pieces.

Tuesday, June 13, 2017

ICAD 2017 #12


Today's card is celebrating summer.

I created the background with a stamp from Watercolor Wings (Stampin' Up) and Hero Arts layering stamp set.  I bought the stamp set last year. I stamped a bunch of flowers out when I first got the stamp set to practice but then never used them in a project.  I decided to fussy cut out a few of the best ones and adhered them onto the card.  The middle flower I popped up with a couple of foam dots.

All the inks used are by Stampin' Up in the following colors:


  • Pink Pirotte, Blushing Bride and Watermelon Wonder for the flowers
  • Pear Pizzazz and Cucumber Crush for the leaves
  • Wistera Wonder for the dots 
I will say that you have to practice with the layering stamps, but they are fun.  

ICAD 2017 #11


Yummy, cupcake delivery truck. Wouldn't that be nice if it came to your town.

I had a shaker card like this in mind since getting the Tasty Trucks stamp set from Stampin' Up. I used the truck, the cupcake, the flag and the banner stamps from that set in Memento Tuxedo Black Ink.  I colored the those stamps with Soho colored pencils (in colors Pink Coral 132, Magenta 134, Naples Yellow Light 201, and Mars Yellow 204).  I punched a bunch of the cupcakes out with 1/2 inch circle punch to make confetti for the card.  I cut the window out of the truck with a craft knife and the fussy cut out the truck.

I made the frame with the frame punch board (by We Are Memory Keepers) out of white card stock.
 Then I used the dot cluster from the Perpetual Birthday Calendar
stamp set by Stampin' Up in Blushing Bride Stampin' Up ink.  I then taped an acetate piece to the back of the frame and glued the truck and banner to the front of the frame and acetate sheet.

Finally, I cut a pink piece of paper and glued it to a index card for the background.  I doubled up some foam tape onto the back of the frame and filled it with the cupcake confetti and glitter.  Fixed the background onto the back of the filled frame.

It is fun to shake the cupcakes around and see them picking out of the truck window.  I went with a pink color theme to give the card a fun whimsy feel.  You could easily make this into a birthday card. Just changing up the color scheme to blue or green, for a male who doesn't appreciate a whole pink card. I am not really a girly, girly but I just love this all pink card.

I do enjoy making greeting cards to send out to my friends and family.  The only thing is that then you don't have your creation anymore.  The nice thing about this challenge is that I  can keep this card from myself and still make a few greeting cards to send out to my love ones.

Sunday, June 11, 2017

ICAD 2017 #10


Today's card I decided to create a simple, but elegant card,  I used two stamps by Stampin' Up called An Open Heart in Memento Tuxedo Black ink.  I bought this stamp set primarily for this branch stamp.  I think it is very pretty.

I colored the image with the following Soho colored pencils:

  • Light Cerulean Blue 158
  • Naples Yellow Light 201
  • Pink Coral 132
  • Carmine 116
  • Raw Umber 220
  • Cadmium Green Light 183
  • Permanent Green Light 181
  • Oxide of Chromium 189
I wanted to keep the coloring soft.  I added a little glitter to the pink flowers.  It is simple but lovely. 

Saturday, June 10, 2017

ICAD 2017 #9


Today I made some of my own glitter "paste" to use on my projects.  I wanted to be able to use the paste with stencils.  I already had some loose glitter that I wanted to use in the paste.  I bought Liquitex Professional Gloss Super Heavy Gel.  I went with a gel instead of a texture paste, because I wanted it to dry translucent.  I used a Stampin' Up Gold fine glitter.  I mixed both in a seal able container.  Then I used Tim Holtz clock stencil on this card.  It does take a while to dry, but the glitter doesn't wipe off at all.

I spread the paste on with a plastic palette knife over the stencil.  It spread very easily and didn't seep
under the stencil.  I did find that after drying the gel is not as raised as a modeling paste, but you can still feel a texture when you run your fingers over it.

Once it was dry, I stamped Laugh, Live, Love (stamp by Art-c stamp/die set) in Memento Tuxedo Black ink randomly on the card. Then I blended Distress Inks Broken China, Victorian Velvet and Dusty Concord in a diagonal strips over the card.  I think the Distress Ink blended easier than the Stampin' Up ink blended yesterday.  The coverage is more even and doesn't show the shape of the blending tool as easily. The Stampin' Up ink does work well though for blending, and I think it stamps better than the Distress Ink,  The colors values are very different though.  One important thing to remember about Distress Ink is that they have a green or brown value to them to give a vintage look to your projects.  Stampin' Up inks doesn't use green or brown to change the values of there colors, but use traditional black and white.  This gives them less of a vintage look, but more of cleaner value. I wanted this card to have more of a vintage look, so I went with the Distress Inks.

I really love how the glitter paste worked as a resist when blending the ink.  This really helps to give contrast to the stenciled image by being able to see the white of the card underneath the gold glitter.  I am going to have to try and find a rose stencil.  It would look so lovely over a red or pink background.  

You don't have to create your own glitter paste, there are many companies that sell glitter pastes.  I just like to DIY some of my art supplies.  I did create another glitter paste with a Recollections fine holographic glitter.  I am going to experiment with some other glitters and some Pearl Ex powder.  I might even try mixing some glitter in textured paste, to compare to the gel paste. I think it is fun to experiment and create something that is unique.

ICAD 2017 #8

Oops...

I missed yesterday's index card.  I didn't want to through away the whole challenge, though.  I am just picking up today.  

Today's card is using a Unity Stamp Co called No Word Blooms.  I used my mini-Misti and a mask to stamp the flower three times.  I then fussy cut the bottom of the card away.  I water colored the flowers with Lost Lagoon and Pear Pizzazz.  I then used a Gold Wink of Stella pen to give some shimmer.  I water colored the top of the flowers with Pear Pizzazz.  I did trim a little of the top of the card. I blended Stampin' Up Tip Top Taupe on a second card.  I then popped up the flowers foam pop ups.

I really like how this card came out.  The color palette is not what I normally choose. This type of challenge is a good way to try things outside of your comfort zone. Take a risk and try something new in your art. 


Thursday, June 8, 2017

ICAD 2017 #7


I have been listening to some songs today talking about love.  Some of them where celebrating love and some where more about the darker side of love.  The funny part is that when I went to create this card, I wasn't trying to create a card about love.

I started out wanting to create an ombre background. I decided to create the background with water color and my Tombow (873, 725, 743) markers.  I think using my  Tombow markers has become a theme this week.  I started with a darker pink, then moved to a lighter pink and then moved on to a peachy color.  I used a 6 Round Mimik brush to spread the color out. I like how the colors blended together.

Then I stamped flowers from a Stampin' Up Paper Pumpkin kit.  I started with the largest flower and worked down to the smallest flower.  I used Memento Tuxedo Black, after the card was dry.  I think it look like the flowers are falling down from the sky.  The effect is very pretty. I used some Wink of Stella Clear Glitter Pen on a few of the petals on the larger flowers.  I wanted a "wink" of glitter on the card. It is just enough to help move the eye around the card. Almost as if they are dew kissed.  I knew once I had that done I wanted the focal point to be just be a single word.

I cut the word love from white card stock on my Cricut machine from the alphabet designs already loaded in the machine. I left it white to contrast against the colorful background. I ran the die cut through my small Xron sticker maker and adhered it down on to the card. I did try to make sure it was following the one third line instead of putting it in the middle of the card.  I have been working on my composition skills. One way to create a pleasing composition is to use the rule of thirds.

I love to craft, create, and stamp......Love says it all.

Wednesday, June 7, 2017

ICAD 2017 #6


Today's card actually started yesterday.  I used the same Tombow water color markers from yesterday's card to make this background.  I had used a large stamping block yesterday as a palette for some of the coloring I did on the stamped image with a paint brush.  The left over color I spritzed with water and then ran an index card through the color.  Some people call this the "smooshing" technique.  I loved how the colors where blending, so I added a little more color and smooshed on more time.  There were a few white spots left on the card. I wanted more blue on the the card, so I used my paint brush to dab on a little more color in those white spots. Then I left the card to dry overnight. I love this technique because the colors are able to blend in unexpected ways and it is fun.


Today I stamped butterflies, with a stamp called ...with her own wings by Unity Stamp Co, with
Basic Gray ink by Stampin' Up and some sheet music (stamp by Unity Stamp Co worn music background stamp).  The basic gray ink is very light. I wanted the stamped images to look faded and worn out.  This ink made that happen.

I spritzed the card one more time with some Perfect Pearl water.  I let that dry naturally.  This left some faded spots in the pink that you can see in the image to the right.  It also gives the paper a slight shimmer.  Then I added some Marina Mist ink (by Stampin' Up) to the edges of the index card to give a dark border that was not overpowering.

Lastly I added some punched butterflies in gold glitter paper.  I love how they give the whole image a sense of movement.  I didn't want to do to much to the background, because I think the colors are so beautiful on there own,  I think I added just the right amount of elements to create interest that blends with the background.  You truly can enjoy the color and the sparkle of the butterflies together in perfect harmony.

Tuesday, June 6, 2017

ICAD 2017 #5


"For some moments in life, there are no words" --David Seltzer

This is why we create art.  Art is a way to give life to those moments when words fail us.  I started creating this card today with a small idea and a die cut (from Give a Hoot cartridge for Cricut).  I knew that I wanted to create a nice little out door scene and not much else.  I let me mind think about the stamps and other supplies I have that I could use to create my scene.

The background paper (from a Colorbox pad) is a bit on the cartoonist or whimsical side, so I kept going with that theme.  I used a stamp by Unity stamp called Camper Bliss.  I used Tombow markers (173, 055, 873, 755, 452) to color the camper in some bright happy colors.  I did use some water and a paint brush to color some of the camper.  The flowers on the camper, the trim and the door are all the same color 755.  I just used more water on the trim and the door to lighten up the color .  I like how bright the colors are with Tombow. I stamped the camper on Strathmore water color practice paper for this image on the smooth side with Archival black ink.


I didn't know what sentiment I was going to use until I had placed all of the elements down.  I add a little water by coloring some white card stock with the Tombow marker 452.  I know that it is not very realistic, but that is what I wanted for this card.  Lastly, I popped up the camper to really make it the focal point of this card.

This card was created at the end of my day today.  I have come to find that it is soothing to create a little art at the end of my day.  It is relaxing me and gets a little stress out before trying to go to sleep. Don't let this challenge get stressful.  Just look around at what you have handy and put something together.  It doesn't have to be perfect, it is just about practicing and creating every day.

I hope this card spreads a little cheer into your day!

Monday, June 5, 2017

ICAD 2017 #4


Today, I wanted to do a little bit of coloring with my watercolor pencils.  I just had to get the Pretty Kitty stamp set from Stampin' Up, because the kitties are so very cute.  I haven't had a chance yet to really play with the stamp set, but I did decide to break out this one to watercolor.

The paper I used, for the background and the scallop circle, is from The Coral Couture mat stack by DCWV. I have had this paper in my stash for a couple of years. I cut the scallop circle with my Cricut machine from the patterns already installed on the machine. The glitter paper is from Recollections Black and Gold Halloween from last year.  I bought that paper stack for the gold foil pages and the glossy black pages, but I think the glitter card stock here helped to break up the darkness of the background paper.

I used watercolor paper by Strathmore that is cold press and is designed to be practice paper.  I like using this paper for coloring when I know that I am not going to be doing a lot of shading or layers. I stamped the image with Archival ink in black in my mini-MISTI. I did have to ink it twice in order for it to be a nice bold line.  When I was picking the colors for the flowers, I went with some yellow ones help marry the yellow scallop and the glitter paper with the image.  I used Sargent watercolor pencils for all of the coloring.  I like these pencils because they melt fully away and they are very vibrant.  I just wish the pencils themselves had the color name or number on them.  

Lastly, I popped up the kitty with 3D Pop up foam squares and the scallop with Scotch foam tape.  I had to do this in order to adhere the scallop over the glitter paper.  If you have every used glitter paper than you know that it is very hard to stick anything to it.  The 3D pop up squares are bit higher than I like, so I am just trying to use them up.

Over all I think this card came out very cute.


Saturday, June 3, 2017

ICAD 2017 #3


I wanted to do something different on today's index card.  A couple of years ago I found Zentangle patterns on the internet. I found it fascinating and soon started researching and hunting out more and more Zentagle patterns.  I also bought a book on Zentangling. Since then I try to Zentangle a little bit each month.  Zentangleing is so soothing and it helps you become a better drawer at the same time.  I decided to Zentangle on a diecut of a tea cup for today's card.

I cut the tea cup from the Love you a Latte cartidge on my Cricut machine. Then I marked some lines on the cup where I wanted to Zentangle.  I then created my patterns with a Micron pen.  I really like those pens.  They have great nibs on them in many different sizes.  Once I had my patterns done, I used Tombow multi-Liquid glue on the top and the bottom.  I let it dry so it becomes tacky, and then applied some blue foil by Tim Holtz and Ranger.  I know that the foil didn't go down evenly.  I had to add a little more glue in some places and then pus down some  more foil, but I like the results.  It looks like this cup is a favorite of it's owner.  Lastly I inked the sides of the cup with Stampin' Up Blushing Bride to try and bring more cohesion to my overall design.

I cut the word Tea with my Cricut machine from the same cartridge.  I then used Stampin' Up Blushing Bride to give the word a ombre effect.  I think it really added some depth to the word.  Lastly I used some blue tissue paper, that I stamped with a Heidie Swap background stamp in Stampin' Up Pool Party. I used my both of my Xryon machines to make the word Tea and the tea cup into a big sticker and stuck them down to the card.

I think this card is a lovely tribute to a delicious beverage.


Friday, June 2, 2017

ICAD 2017 #2


Happy National Donuts Day!

I just had to make a donuts card for National Donuts Day.  Don't they just look so yummy.  I had so much fun putting this card together. These donuts truly have no calories, even better!

I cut the donuts from card stock with my Cricut machine and the Love you a Latte cartridge.  I did use my Xyron sticker maker to put the pink and brown layers together.  The Xyron sticker makers are really wonderful ways to put together your die cuts, without getting glue everywhere.  I have two of them, the small one and the medium size one. I will be putting them to good use over this challenge.

The background is a designer paper pack called Carnival from Colorbox that I have had for about a year now.  I cut a doily from tissue paper with my doily die.  The word "sweet" was stamped with Archival Ink the color Coffee from Ranger, and the stamp was from a Paper Pumpkin kit by Stampin' Up. I wanted to keep this card bright and simple, so I didn't ink the sides of the card or the donuts.

I like the brightness of this card.  It brings a smile to my face just looking at it.

I hope you had a great Donut Day!

ICAD 2017 #1


It is June 1st and that means the Index Card A Day Challenge has started again.  This is a 61 day challenge to make art everyday on an index card.  It is a way to try and get your crafty or arty mojo pumping.  I tried my hand at this challenge last year and made it through 14 days.  I am going to try and make it the full 61 days this year!

If you would like to get more information about this challenge, please visit the Daisy Yellow Blog.

Last year I focused on stamping, but this year I am going to focus on die cuts.  I need to show my Cricut machine and my Big Shot machine a little love, so I am going use die cuts on many of my cards this year.  I am also going to try to practice my ink blending over the next two months as well. This is not a requirement of the challenge, but I found it helpful last year to have some ideas of what I wanted to practice on these cards.  This way I have a jumping of point instead of just staring at a blank card.

On my first card this year I used a die cut from Tim Holts Thinlets set Gearhead.  This die set comes with 21 individual dies that cut out a slew of different size and shaped gears, but it also comes with this one die that cuts a corner piece.  I cut this piece out several weeks ago not knowing what I was going to do with it.  In the background I blended the Stampin' Up inks So Saffron and Pool Party.  I then used a Fiskar stamp with Archival ink Coffee by Ranger to stamp out the flowers.  Lastly I added the two butterflies with my Martha Stewart three butterfly punch.  I really love the hard and soft feeling of this card.

I hope that you will feel inspired to try this challenge.  It is never to late to start.  Please come back tomorrow to see the next card in the challenge.