Wednesday, March 28, 2018

GCW - Week 4


Greeting Card Wednesday


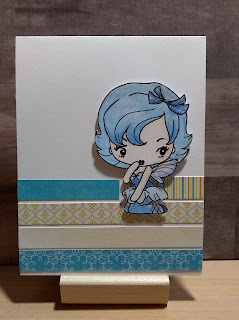
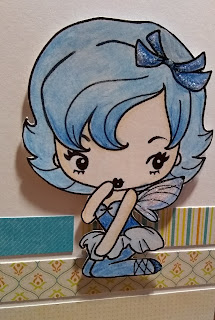
This was a quick card for a quick blog post.  I took inspiration from the CAS(E) this sketch! blog challenge #264. This sketch can be used in so many ways.  I took scraps from a previous project to make the lines.  I had colored the Cheeky Fairy from the Greeting Farm ages ago.  I was practicing some monochromatic coloring with my colored pencils.  Her blue hair and dress just coordinated with the papers perfectly.  I popped her up with some fun foam. 


Product Used:

  • Citrus mat stack 4.5 x 6.5 inches by Die Cut With a View
  • Greeting Farm Digi Stamp Cheeky Fairy
  • Soho Colored Pencils
  • Stickles
  • Tombo Mono Tape Runner
  • Fun Foam from Dollar  Tree

Relax - Craft - Repeat!

Wednesday, March 21, 2018

GCW - Week 3


Greeting Card Wednesday

Scrap Attack!

March sure has roared its wintery best today.  We had a winter mix of snow and sleet rain down for most of the day.  This calls for a nice springy card to brighten everything up.

I dug through some of my scraps and created this playful card in a standard A2 size.  The designer paper all came from the same paper pad. I love to layer my pattern paper with a neutral color. I think it gives the card a more professional finished design, but sometimes it can make the card very heavy.  I decided to use white for my layers in order to make this card bright and light. I also used a white card base.  This way I element a layer, by using the card base as the bottom white layer.  Then I cut the bee pattern paper 1/4 of an inch smaller. This really helps to keep the card light. 

I took some baker's twin and wrapped it around the honey comb layer three times, and then tied a bow.  The main daffodil image was a cut apart in the paper pack.  I brought in some blue textured cardstock to help it pop off the card.  I also popped up the daffodil image with some fun foam.  Lastly, I added some Glitter Pen to the daffodil flowers to give the card some extra sparkle.  

Products Used:

  • Garden Party 6x6 Paper Pad by Pebbles from 2013
  • Blue Texture Cardstock
  • White Cardstock
  • Spectrum Noir Clear Glitter Pen
  • White and Gold Bakers Twine
  • Tombow Tape Runner


The card just screams spring to me.  I hope today was the last of the sleet and snow with warmer days are on the way. Along with the some pretty flowers!

Wednesday, March 14, 2018

GCW - Week 2


Greeting Card Wednesday


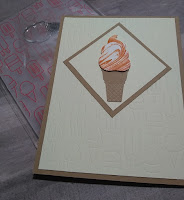
Today's card is a yummy ice cream cone card. 

This card came out very cute.  The color scheme is very neutral that makes this a great card for either a male or female recipient.  It is a standard A2 card size, so there is plenty of room for a message and a treat (such as a gift card) inside.

Products Used:
  • Light brown and Cream Cardstock 
  • Stampin' Up Frozen Treats Framelits Dies 
  • Stampin' Up Marbled Die
  • Stampin' Up Tangelo Twist ink (Retired)
  • Craft Smart Embossing Folder from Michaels
  • Spectrum noir Clear Glitter Brush Pen
I first stamped the Marble die onto some white cardstock.  Then I positioned the die over a part of the stamp that I liked the swirl and cut it out.  I also cut out from the die set an ice cream cone.  This particular die both cuts and embosses at the same time.  I then embossed a piece of cream card stock, which was cut down to 4 x 5 1/4. This embossing folder is very cute and works so well with this die set.  


*Note: I have a Sizzix Big Shot machine.  The first time I used this embossing folder with the normal sandwich, it actually cut some of the shapes out of the paper.  I had to play with my sandwich to get a good embossing without it cutting through the paper. 


The square pieces are 2 1/2 and 2 1/4 inch squares that I just turned on it side.  The only part of the card that is dimensional is the ice cream swirl.  I popped it up with a piece of fun foam.  All the rest of the pieces I adhered flat. This way you get some dimension without it being to hard to mail.  


Lastly, I added some sparkle to the ice cream with a the glitter pen.  I did have to be careful with the glitter pen, because the Stampin' Up ink is a die ink. It will react with water.  If you quickly dab with the pen instead of swiping, you can add the glitter without moving to much of the ink.  I think it just adds that extra punch to the card.  


Happy Wednesday!

Wednesday, March 7, 2018

GCW - Week 1

Greeting Card Wednesday


Happy Wednesday!

I am back.  My full time job was very busy in January and February leaving me little time to craft and even less time to blog.  The job has calmed down. No more six days work weeks, so I am focusing on how I would like to grow this blog.  I am starting off with Greeting Card Wednesday. 

Greeting Card Wednesday is my commitment to post a new greeting card each Wednesday for the rest of 2018.   I will still be doing the Cas(e) this sketch (CTS) challenge, but not necessarily every week will be challenge inspired greeting card.

This week is the CTS challenge number #261, which was a retro sketch challenge.  The sketch originated on there blog at #93.  I really liked this sketch, and had several ideas pop into my head immediately.  I had also just received an order from Stampin' Up, so I just had to play with those new items.  

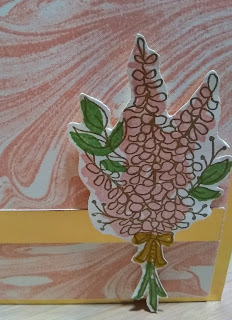
I love how this card came out.  It was super fun to make and I made it in very little time.  The lavender sprig is a multi-layer stamp that was very fun to stamp out.  I am definitely going to stamp out more of these. The outline is one stamp and then the color pieces are each their own stamps.  This makes using a lot of different colors very easy, because you don't have to worry about inking to much of the stamp.  


         Products Used:


  • Stampin' Up Marble Stamp
  • Stampin' Up Lots of Lavender (Salebration stamp set available from January 2018 through March 31, 2018)       


  • Stampin' Up inks: Soft Suede, Blushing Bride,Delightful Dijon, and Wild Wasabi       


  • Stampin' Up Very Vanilla Cardstock       


  • Neenah White Cardstock for Card base       


  • Dollar store Gold Poster Board       


  • Pop Dots       


  • Tombow Xtreme tape runner
  • Mini-Misti


  • The marble background stamp is very lovely.  I used Blushing Bride to stamp the background on Very Vanilla cardstock. Looks like designer paper, doesn't it. I also stamped out the lavender sprig on the same cardstock.  I love Very Vanilla cardstock.  It is the perfect shade of cream. The marble background is cut to 4x5 1/4 inches, and the mirror gold is the full 4 1/4x5 1/2 inches. The gold strip is 4x1/2 inches. I taped it onto a card base that is also 4 1/4x5 1/2 inches.  I like the inside of my card to be white, so I typically always use a white card base. I think this card came out very elegant and pretty.

    I didn't add a sentiment on purpose. My style is to have the sentiment inside of the card instead on the outside. This allows me to use the card for several different occasions.  It also encourages people to open the card to see what is on the inside.  This card could be used for so much.  It can be an easter, birthday, anniversary, sympathy, wedding, or thank you card and so much more.  I do want to try to utilize some of my sentiments stamps more, so I am thinking of challenging myself to use them in an unusual way.  Such as a background instead of a focal element.

    Please leave me a comment below.  Relax - Craft -Repeat!