Friday, May 10, 2019

Cricut Design Space


Lace Tulip Card

Spring came with it's lovely inspiring array of colors.  Inspired by all of the beautiful flowers blooming at this time of year, I created a Lace Tulip Design in Cricut Design Space.  I used only the circle shape to make the flower and stem.  This card was created using only two supplies that are listed below this video.

I didn't show in the video, but the Love You sentiment is using font A Perfect Day.  This font is a Cricut supplied font. Whenever I cut out fonts, I like to cut two.  This way if one doesn't release from the mat or contact sheet correctly, you have a spare ready to go.  Both of my fonts did release perfectly, so I made two cards at one time!

Here is the video on how I made the design and put it on my card:


Supplies Used in Greeting Card:

* Neenah 110 lb White Cardstock
* Cricut Adhesive Foil - Gold 

Friday, May 3, 2019

Cricut Design Space


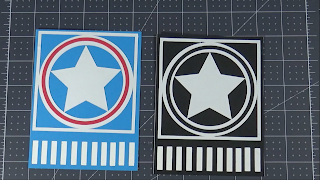
Captain America Logo Card

My card today is a Captain America Logo card similar to the Marvel Avenger Logo card from my last post. I had so much fun creating the Avenger's card, I wanted to keep going.

Here is some information about the software I am using to create these logos. The Cricut Design Space software allows you to cut many different images with a Cricut Explore or Maker die cutting machines.  The software is free, but you do have to pay for images created by Cricut or their guest designers. You can upload your own svg images and cut them as well. I wanted to show that you still have a lot of options to create your own images by just using the basic shapes that are free in the software. I was inspired by all of the people doing punch art with circle punches. Once you have created a image in Design Space you can save it under your projects, so that you can make more in the future.

I created two cards today.  One in black and white to match the Avengers card and one in Captain America's traditional red, white and blue colors. The card size is a US standard 4 1/4 x 5 1/2 inches on Neenah 100lb white cardstock card base.  I did create an additional background layer with strips at the bottom.  I layered the background onto the card base with the intention of the white showing through the cut outs at the bottom of the first layer.  I like having the layers to create some depth on the card without creating a lot of bulk to the card. I also used Art Glitter Glue to attach all of the pieces.

Below is the video showing how I created the logo in Cricut Design Space and how I assembled the traditional red, white and blue card. 


Please let me know in the comments below if you like the traditional or black and white version of the cards.

Happy creating!